No-Dev Ops: Automating Product Workflows with Ezpa.ge Forms and Google Sheets Triggers


Product and ops teams are under pressure to move faster without adding headcount, tickets, or technical debt. You’re expected to:
- Qualify leads in minutes, not days
- Route requests to the right owner automatically
- Turn feedback into roadmap input without another spreadsheet cleanup
But most teams still rely on manual glue: exporting CSVs, copying data between tools, and pinging people in Slack. It works—until it doesn’t. Things slip. SLAs get missed. Nobody trusts the spreadsheet.
This is where a “No-Dev Ops” mindset shines: using tools you already know (forms + Google Sheets) as a lightweight automation platform. With Ezpa.ge streaming form responses directly into Google Sheets, your team can build surprisingly powerful workflows—without writing a line of code.
This guide walks through how to use Ezpa.ge forms and Google Sheets triggers to automate real product workflows: lead routing, user feedback loops, internal requests, and more.
Why “No-Dev Ops” Matters for Product Teams
When you depend on engineers for every workflow change, you get:
- Slow iteration – Small changes wait in the backlog.
- Shadow systems – Teams spin up their own forms, docs, and tools.
- Brittle scripts – One schema change breaks someone’s custom script.
A no-dev approach flips that:
- Ops and PMs own the system – They design forms, define rules, and adjust flows.
- Google Sheets becomes the control room – One place where data lands, gets enriched, and triggers action.
- Engineering focuses on core product – Not on building yet another internal tool.
If you’ve already been thinking about putting operations “in the loop” with live data, this is the natural next step after making your forms real-time triggers. (If not, you’ll get a lot out of reading Ops in the Loop: Using Real-Time Form Data to Trigger Playbooks, Notifications, and Automations alongside this guide.)
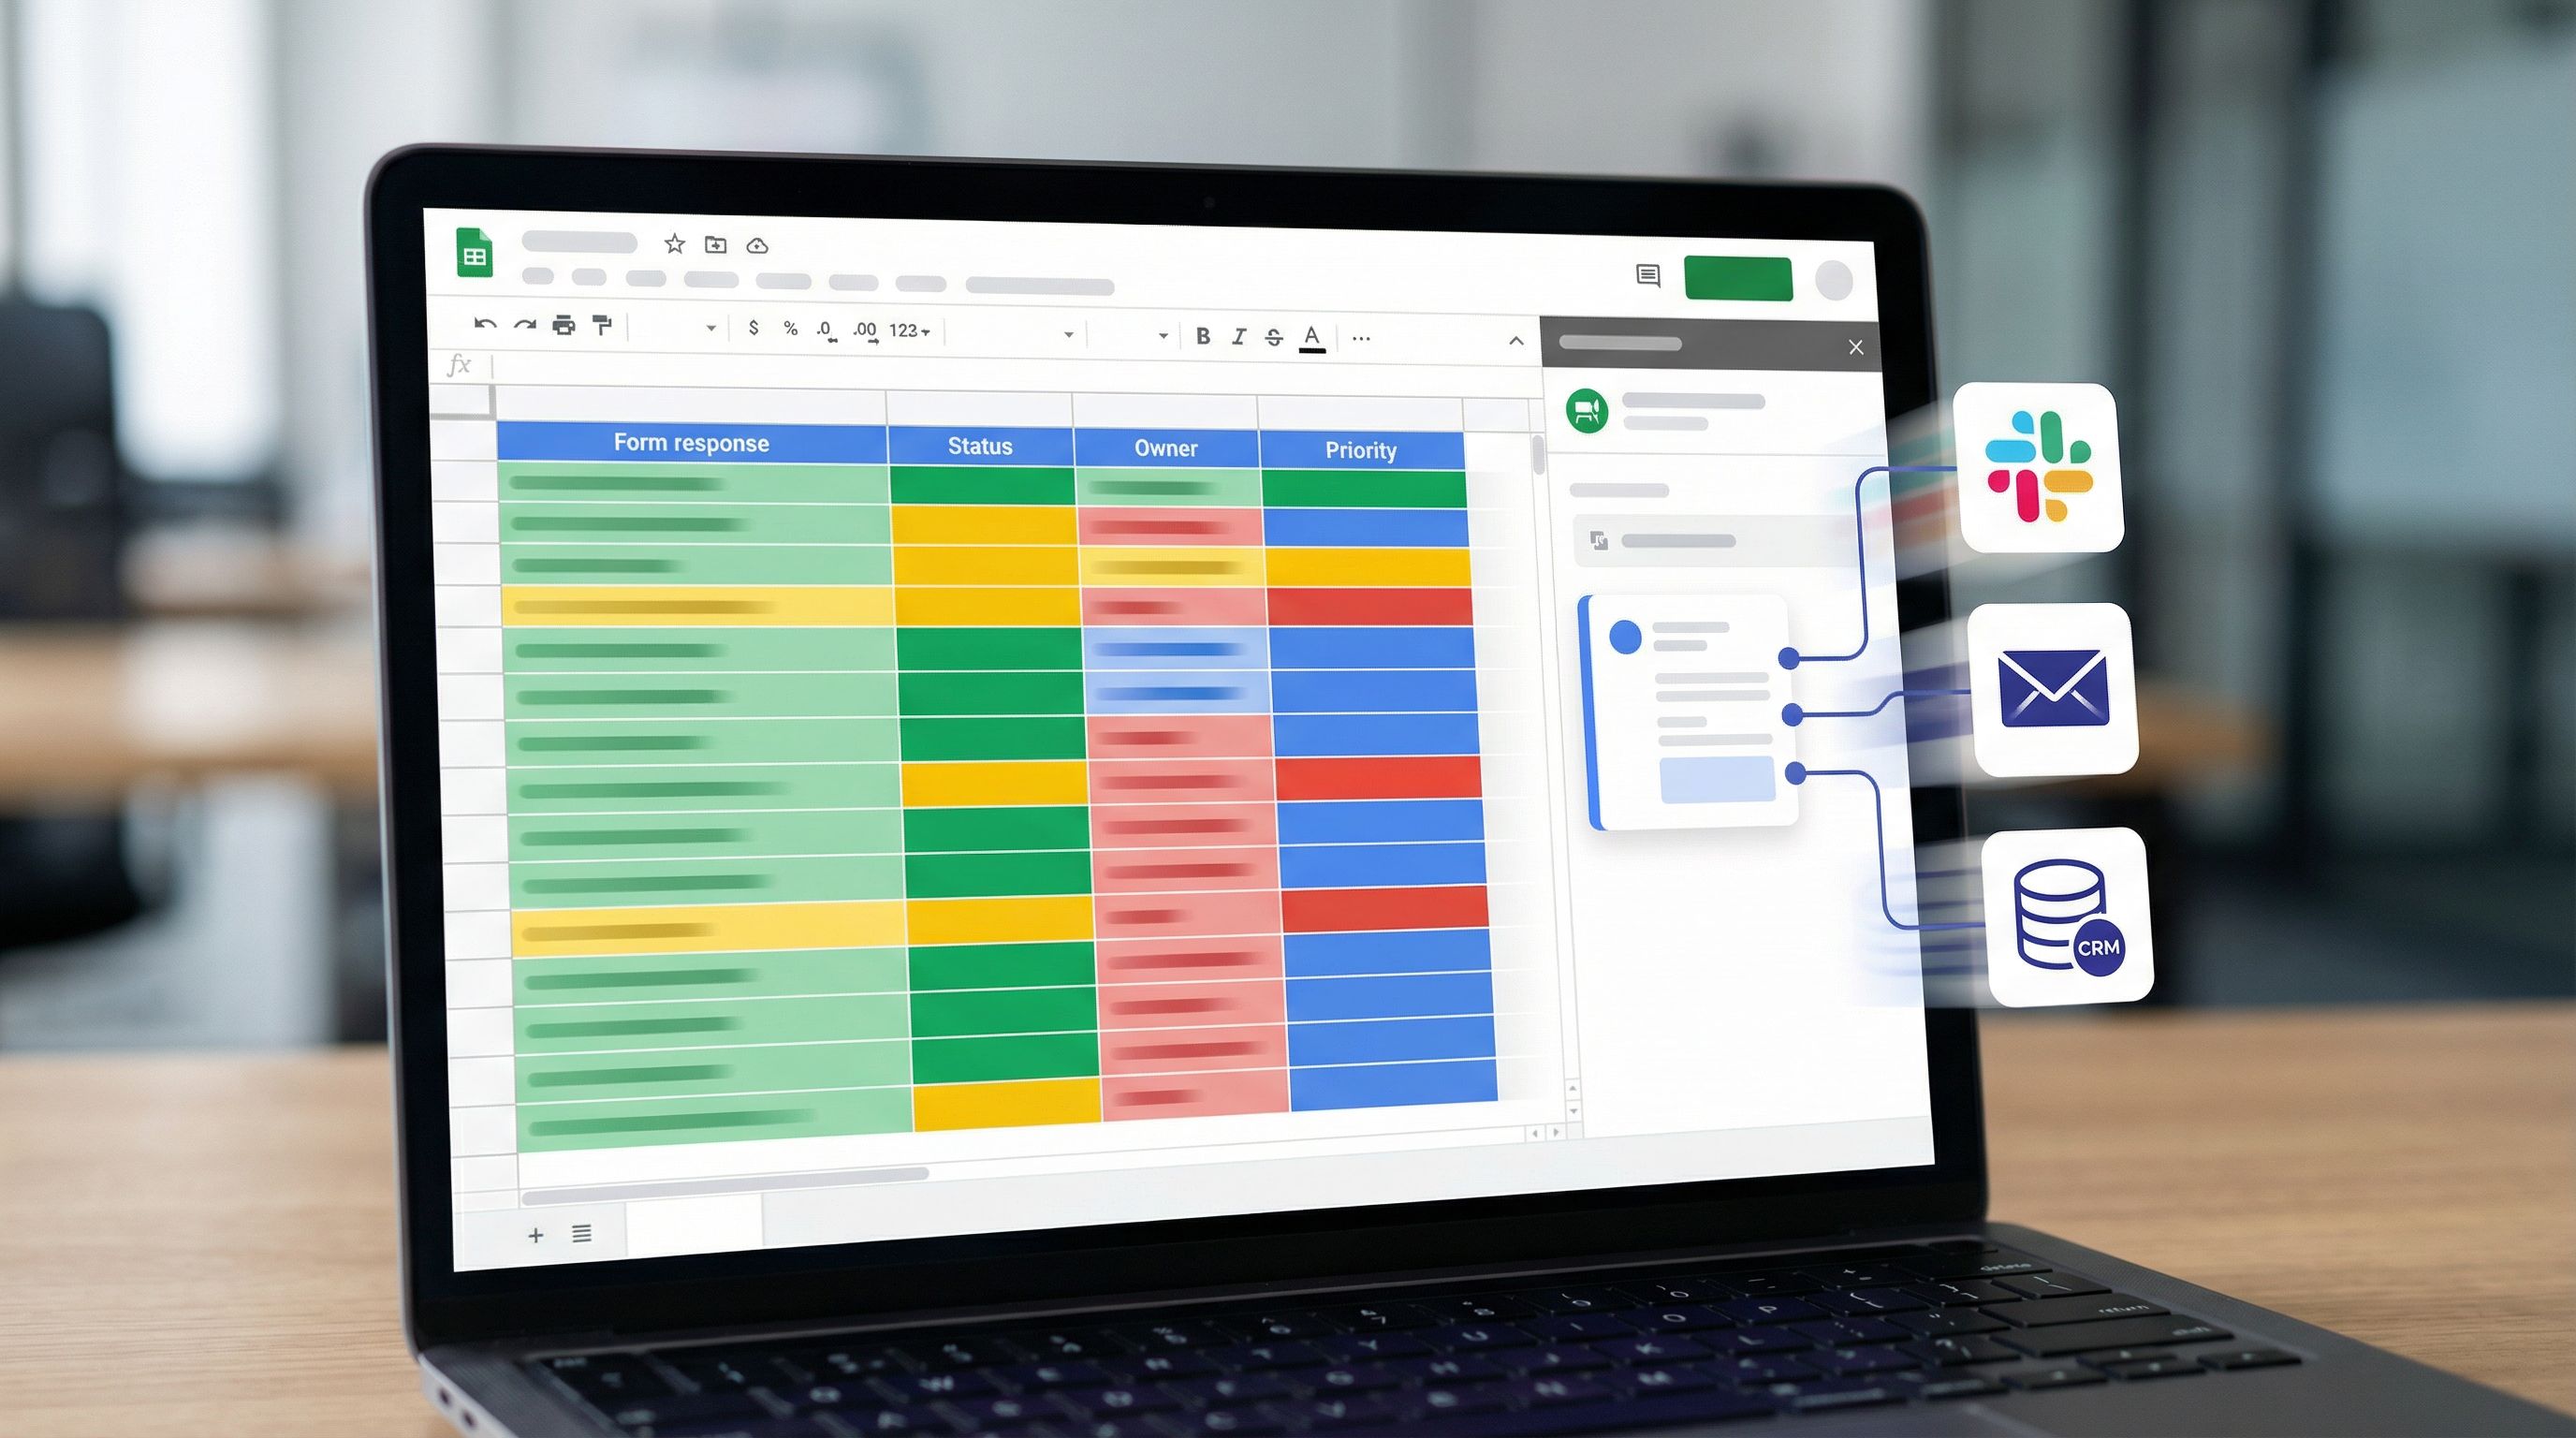
The Core Stack: Ezpa.ge + Google Sheets + Triggers
Let’s define the building blocks.
1. Ezpa.ge forms as your front door
Ezpa.ge makes it easy to create:
- Branded, responsive forms that look great on any device
- Custom URLs that feel trustworthy and on-brand
- Flexible fields and layouts that fit everything from micro-surveys to complex intake
- Real-time Google Sheets syncing so every submission lands in your sheet in seconds
Forms become the “front door” for workflows: lead capture, beta signups, internal requests, bug reports, and more.
2. Google Sheets as your workflow engine
Once responses are streaming into a connected Google Sheet, that sheet becomes more than a database—it’s a rules engine.
You can:
- Add helper columns to classify, score, or route submissions
- Use formulas to clean and validate data
- Build views and filters for different teams
- Drive dashboards and live reports
If you want to go deeper on using Sheets as a source of truth, check out Offline Teams, Online Forms: Operational Playbooks for Making Google Sheets Your Single Source of Truth.
3. Triggers that turn rows into actions
Once data is in Sheets, you can use:
- Google Sheets → Extensions → Apps Script (built-in scripting)
- Make or Zapier (no-code automation platforms)
- IFTTT or Pabbly Connect as alternatives
…to watch for new or changed rows and then:
- Send Slack or email notifications
- Create tickets in tools like Jira, Linear, or Asana
- Update CRM records in HubSpot, Salesforce, or Pipedrive
- Trigger onboarding sequences or internal playbooks
The pattern is simple:
Form submission → New row in Google Sheets → Trigger → Action in another tool

Step 1: Design the Workflow Before the Form
The biggest mistake is starting with fields instead of flow.
Before you open Ezpa.ge, answer three questions:
-
What moment are we capturing?
- A sales lead asking for a demo
- A user reporting a bug
- A customer requesting a feature
- An internal team member requesting support
-
What should happen within 5 minutes of submission?
- A human gets notified?
- A ticket is created?
- A record is updated in the CRM?
- An automated email goes out?
-
What data is absolutely required to make that happen?
- Who owns it (team, person)?
- How urgent is it?
- What context is needed to move forward without follow-up?
You’re not just designing a form; you’re designing the first step of a system. If you want a deeper dive on mapping the user journey before you add fields, Flow, Not Fields: Mapping Your User’s Mental Journey Before You Design a Single Input is a great companion read.
Outcome of this step: A short spec like:
"When someone requests a demo, we capture company size, use case, and region. Within 5 minutes, the right AE gets a Slack ping and a qualified lead is created in HubSpot."
That spec will guide every field and every trigger.
Step 2: Build an Ezpa.ge Form That’s Automation-Ready
With your workflow spec in hand, it’s time to build the form.
Keep the form lean but structured
For automation, structure beats volume every time.
- Prefer dropdowns and multiple-choice over open text when you need to route or score.
- Example: “Team size” as ranges (1–10, 11–50, etc.) instead of a free number.
- Use required fields sparingly but intentionally.
- Only mark fields required if they’re truly needed for routing or follow-up.
- Add a hidden field for metadata if helpful.
- Campaign source, product area, or experiment variant.
If you’re running small, targeted forms across your product (like in-app micro-surveys), you can combine this with ideas from Micro-Surveys, Macro Insight: Using Tiny Forms Across Your Product to Unlock Continuous Feedback to keep things lightweight.
Use themes and URLs to set expectations
Automation works best when users trust the form:
- Use a consistent theme so the form clearly belongs to your brand.
- Set a clear title and description that explain what happens next.
- Example: “We’ll get back to you within one business day.”
- Choose a custom URL that matches the workflow.
- Example:
yourbrand.com/demo-requestoryourbrand.com/report-a-bug.
- Example:
A trustworthy, focused form increases completion rates—which means more data flowing into your automated system.
Connect the form to Google Sheets
In Ezpa.ge:
- Open your form settings.
- Connect a Google account.
- Choose “Sync responses to Google Sheets” (or equivalent integration option).
- Either create a new Sheet or select an existing one.
Every new submission will now appear as a new row, with columns matching your fields.
Tip: Lock down who can edit the Sheet structure. Your automations will rely on column names staying stable.
Step 3: Add “Ops Columns” in Google Sheets
Your raw form data is useful. But for automation, you usually need a layer of interpretation.
Add extra columns in your Sheet that your form never sees—these are for ops logic only:
- Status – e.g.,
New,In Progress,Done,Won,Lost - Owner – person or team responsible
- Priority –
P0,P1,P2based on rules - Tags – product area, use case, segment
- Next step –
Create ticket,Send follow-up email, etc.
You can populate some of these with formulas:
- Use
IF()orIFS()to set priority based on company size or issue type. - Use
VLOOKUP()orXLOOKUP()to map regions to owners. - Use
REGEXMATCH()to detect keywords in description fields.
This is the same pattern we explore in depth in Real-Time Guardrails: Using Google Sheets Logic to Auto-Clean and Validate Form Data. Here, you’re doing it not just for data quality, but for routing.
Example formula for priority:
=IFS(
  AND([@[Company Size]]="500+", [@[Use Case]]="Mission-critical"), "P0",
  [@[Company Size]]="100-499", "P1",
  TRUE, "P2"
)
Once these columns are in place, your automations can trigger off Status, Priority, or Owner instead of raw fields.
Step 4: Create Triggers with Apps Script or No-Code Tools
Now comes the fun part: turning rows into actions.
You have two main paths:
Option A: Google Apps Script (built-in, low-code)
Google Apps Script lets you run JavaScript-like code when:
- A form submission creates a new row
- A cell is edited (e.g., Status changes to
In Progress)
Basic pattern:
- In your Sheet, go to Extensions → Apps Script.
- Write a function like
onFormSubmit(e). - Use
e.valuesore.rangeto read the new row. - Call external APIs (e.g., Slack, Linear, HubSpot) using
UrlFetchApp.fetch().
Example use cases:
- Post a Slack message to
#new-leadswhen a row withPriority = "P0"appears. - Create a Jira ticket when
Issue Type = "Bug". - Send a templated email via Gmail when
Statuschanges toDone.
This path is powerful, but it does require someone comfortable reading and editing scripts.
Option B: No-code automation platforms
If you want something more visual and team-friendly, use tools like:
- Make – Flexible, visual scenarios; great for complex branching.
- Zapier – Huge app ecosystem; very approachable.
Typical workflow:
- Trigger: “New or updated row in Google Sheets”
- Filter: Only continue if
Status = "New"orPriority = "P0". - Actions:
- Create or update a record in your CRM
- Send a Slack/Teams message
- Create a task in Asana/ClickUp/Linear
- Send a confirmation email
Because Ezpa.ge is already handling the front end and Sheets integration, your automation tool only needs to focus on what happens next.
Step 5: Real Workflow Examples You Can Steal
Let’s make this concrete with some patterns you can adapt.
1. Lead routing for product-qualified leads (PQLs)
Goal: When a high-intent lead fills your Ezpa.ge demo form, an AE gets notified instantly and a CRM record is created.
Setup:
- Form fields: Name, email, company, company size, role, use case, region.
- Sheet ops columns:
Priority,Owner,Status. - Logic:
Priority = P0if company size ≥ 100 and use case includes "migration" or "enterprise".Ownerdetermined by region.
Automation:
- Trigger: New row in Google Sheets where
Priority = "P0". - Actions:
- Create a contact and deal in your CRM.
- Post to Slack: “New P0 lead: {{company}} – {{use case}} – {{owner}}.”
- Set
Status = "Routed"in the Sheet.
2. Bug reports that create tickets automatically
Goal: Users report bugs via a public Ezpa.ge form; critical issues become tickets automatically.
Setup:
- Form fields: Email (optional), environment, severity (dropdown), steps to reproduce, screenshots link.
- Sheet ops columns:
Status,Owner,Tag(e.g.,frontend,backend).
Automation:
- Trigger: New row with
Severity = "Blocker"or"High". - Actions:
- Create an issue in Jira/Linear with full description.
- Assign to the right team based on
Tag. - Post a message to
#bug-triagewith a link to the ticket.
For lower-severity issues, you might just tag and batch them for weekly review—still powered by the same sheet.
3. Feature requests feeding your roadmap system
Goal: Feature requests via forms are tagged, scored, and surfaced in your roadmap without manual triage.
Setup:
- Form fields: Who you are (customer, prospect, internal), product area, description, impact.
- Sheet ops columns:
Segment,Impact score,Theme.
Automation:
- Trigger: New row.
- Actions:
- Use formulas or AI enrichment (via automation tools) to categorize into
Theme. - For high-impact + high-frequency themes, post a weekly digest into your product team’s Slack channel.
- Use formulas or AI enrichment (via automation tools) to categorize into
This pairs nicely with the system thinking in From Survey to System: Designing Feedback Forms That Actually Change Your Roadmap.
4. Internal ops requests (IT, facilities, data)
Goal: Team members use a single internal form for requests; each submission is routed to the right queue.
Setup:
- Form fields: Request type (IT, facilities, data), urgency, description, location.
- Sheet ops columns:
Owner team,SLA target,Status.
Automation:
- Trigger: New row.
- Actions:
- Route to different Slack channels or ticket systems based on
Owner team. - Set a due date in your task manager based on
SLA target.
- Route to different Slack channels or ticket systems based on
Step 6: Make It Safe, Observable, and Easy to Change
Automation without guardrails can create new problems. A few practices keep your “No-Dev Ops” stack healthy:
Use a staging sheet for changes
- Clone your live Sheet.
- Point a test Ezpa.ge form at the clone.
- Build or modify your automations there first.
- Once stable, swap the automation to watch the live Sheet.
Log every automated action
In your Sheet or automation tool, keep a simple log:
- Timestamp
- Row ID
- Action taken (e.g., “Created Jira ticket #ABC-123”)
- Result (success/failure)
This makes debugging far easier when something feels off.
Keep column names stable
- Avoid renaming or deleting columns once automations depend on them.
- If you must change, update your automation mappings at the same time.
Document the workflow
Even a simple one-pager in your internal wiki that says:
- Which form feeds which Sheet
- What each ops column means
- What automations run and when
…will save you from “mystery automations” later.
Bringing It All Together
Ezpa.ge + Google Sheets triggers give you a lightweight, flexible way to automate product workflows without leaning on engineering for every change.
You’ve seen how to:
- Design the workflow first, then build the form to match
- Use Ezpa.ge to ship branded, trustworthy forms that sync directly into Sheets
- Layer ops logic in Google Sheets with helper columns and formulas
- Use Apps Script or no-code tools to turn rows into Slack messages, tickets, CRM records, and more
- Apply real-world patterns for lead routing, bug triage, feature requests, and internal ops
The result is a “No-Dev Ops” toolkit your product and operations teams can actually own.
Your Next Move
You don’t need a giant project to get value from this. Start with one workflow.
- Pick a single form that already matters—demo requests, bug reports, or internal requests.
- Connect it to a fresh Google Sheet via Ezpa.ge.
- Add 3–4 ops columns:
Status,Owner,Priority,Next step. - Set up one simple trigger—for example, “When
Priority = P0, send a Slack message to the team.” - Run it for a week, then refine.
Once you see how much manual follow-up disappears from that one workflow, it becomes obvious where to go next.
If you’re ready to try this, open Ezpa.ge, spin up a form, connect it to Sheets, and build your first trigger. Your future self—and your ops team—will thank you.