Forms as Feature Flags: Using Conditional Logic to Soft-Launch Ideas Without Writing Code


Forms as Feature Flags: Using Conditional Logic to Soft-Launch Ideas Without Writing Code
Product teams have a secret they don’t talk about enough: most “big” launches start as very small experiments.
A hidden toggle here. A beta invite there. A feature that only appears for a specific segment. All of that is powered by one idea: feature flags—the ability to turn things on or off for certain people without shipping new code every time.
But what if you don’t have engineers on tap? Or you do, but they’re fully booked for the quarter?
That’s where forms—with smart conditional logic—can quietly act as your feature flag system.
Instead of pushing code, you:
- Spin up a form in Ezpa.ge
- Add a few branching rules
- Wire it to a Google Sheet
- Use it to decide who sees what and when
You get the benefits of feature flags—control, segmentation, soft-launches—without touching your codebase.
Why "forms as feature flags" matters
Most teams feel this tension:
- You want to experiment more: new offers, new pricing, new onboarding paths, new product ideas.
- Engineering capacity is finite: every experiment competes with core roadmap work.
- Risk is real: you don’t want a half-baked idea visible to everyone.
Traditional feature flag systems (like LaunchDarkly or ConfigCat) are powerful—but they assume you already have a feature in code.
Forms flip that sequence:
Instead of “build → ship → gate,” you can “gate → learn → decide whether to build.”
That matters because:
- You can validate demand before investing: Only build what people opt into.
- You can target tiny, safe cohorts: A handful of customers, a specific segment, or even just internal teams.
- You can iterate on the logic instantly: No deploys, no tickets—just update your form.
If you’ve read our piece on Form-First Launches, this is the next step: not just using forms as front doors, but as switchboards for what users see and experience.
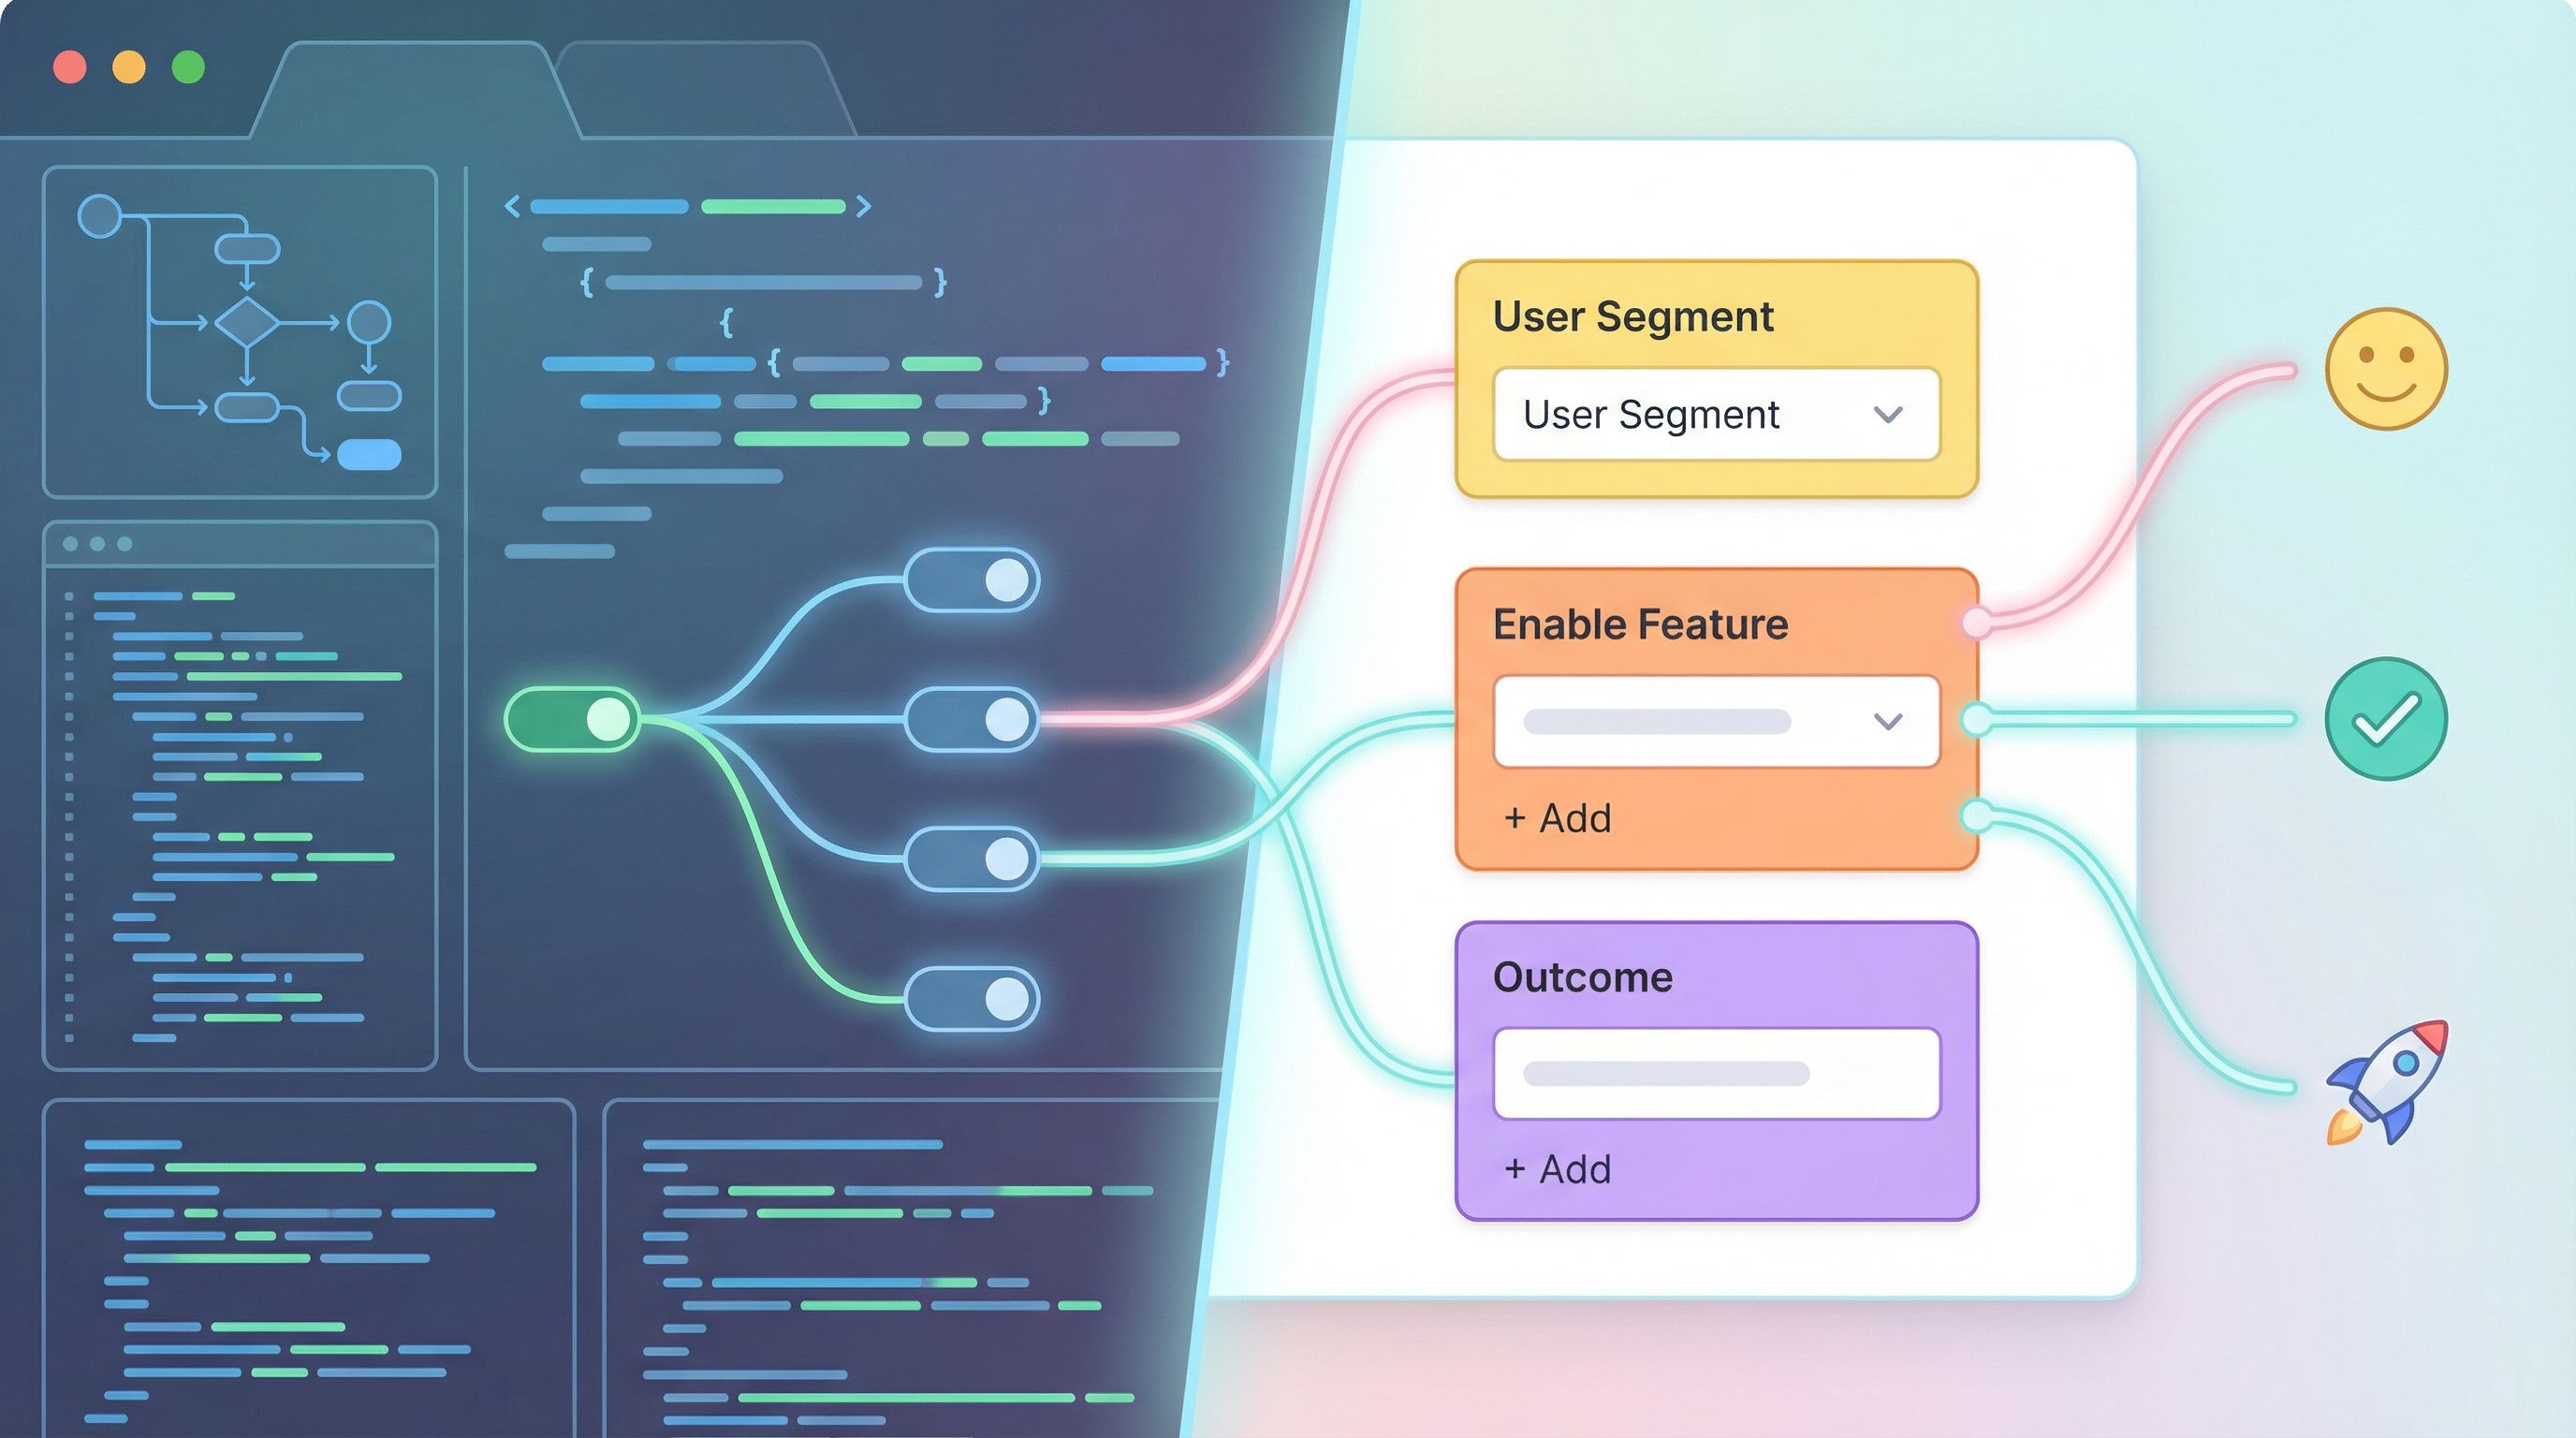
How conditional logic turns a simple form into a control panel
Conditional logic is the bridge between “just a form” and “feature flag behavior.” At its core, it’s:
If X is true, then show Y, hide Z, or route to W.
In Ezpa.ge, that can look like:
- Show a follow-up question only if someone chooses a certain option
- Route certain responses into a different Google Sheets tab
- Display a different confirmation message based on answers
With a few of these rules, your form becomes a decision engine.
Here are the core building blocks you’ll use:
-
Eligibility questions
Ask the questions that define who should see the new thing:- Company size
- Role (e.g., “Are you a current admin?”)
- Use case (“What are you primarily using our product for?”)
- Risk level (“Is this for production or testing?”)
-
Branching paths
Use conditional logic to:- Show a “beta feature interest” section only if they match your target profile
- Hide advanced options for users who don’t meet criteria
- Collect extra consent when the feature is experimental
-
Dynamic confirmations
After submission, show different outcomes:- “You’ve been added to the waitlist for Feature X”
- “Thanks—this isn’t a fit yet, but we’ll let you know when it is”
- “You’re in. Here’s your link / code / next step.”
-
Sheets as a live flag table
With Ezpa.ge syncing to Google Sheets in real time, your sheet becomes your feature flag registry:- One row per user
- Columns like
feature_x_enabled,beta_cohort,risk_level,onboarding_path - Filters and views that drive who gets access, manually or via automation
If you’ve explored From Spreadsheet Chaos to Source of Truth, this is exactly the kind of structured table that makes experiments manageable.
Use case #1: Soft-launching a new feature to a handpicked cohort
Imagine your team is considering a new “Usage-Based Billing” feature.
You’re not ready to expose it in-product yet, but you are ready to:
- Gauge interest
- Collect a small beta group
- Understand requirements and concerns
Here’s how to run that as a “form as feature flag” experiment.
Step 1: Design the eligibility gate
Create a form section called something like “Help us shape our next billing experience”.
Key questions:
- “What’s your current monthly spend with us?” (range or multiple choice)
- “How many active seats do you manage?”
- “Would you be open to trying a new billing model in the next 60 days?” (Yes/No)
Use conditional logic so that:
- If they answer Yes, show additional questions about their needs.
- If No, keep the form short and just capture their reason.
Step 2: Add a hidden beta opt-in branch
Add a conditional section that only appears if:
- Monthly spend is above a certain threshold and
- They said Yes to trying a new model
In that branch, ask:
- “How many internal stakeholders would be involved in this change?”
- “What would make this a clear win for you?”
- “Are you comfortable with limited documentation and a dedicated contact during the beta?” (checkbox)
Now your form is doing what a feature flag system would do in code: selecting a cohort based on rules.
Step 3: Use dynamic confirmations as your “flag flip”
Set up confirmation logic:
- Beta-ready cohort: “You’re a great fit for our upcoming billing beta. We’ll reach out within 3 business days with next steps.”
- Not yet: “Thanks for your input—this helps us design a billing model that works better for you. We’ll let you know when it’s more mature.”
You haven’t changed a single line of product code, but you’ve effectively:
- Defined eligibility
- Selected a cohort
- Communicated different outcomes
Step 4: Treat your sheet as the source of truth
In Google Sheets, add columns like:
billing_beta_candidate(TRUE/FALSE)billing_beta_status(invited / active / declined / completed)billing_beta_priority(High/Med/Low based on spend)
You can:
- Filter by
billing_beta_candidate = TRUEto see your cohort - Use a tool like Make or Zapier to send invites automatically
- Update
billing_beta_statusas conversations progress
Your “feature flag” is now a row in a spreadsheet instead of a config file.

Use case #2: Routing people to different experiences from one URL
Feature flags are often about who sees what UI. You can mimic that behavior with one Ezpa.ge form and a few clever redirects.
Imagine you have three experiences you might want to offer from a single entry point:
- A standard signup flow
- A concierge onboarding for high-value accounts
- A “coming soon” waitlist for a new product line
You don’t want three separate public URLs. You want one URL that quietly routes people based on their answers.
Step 1: Ask the minimum questions needed to route
At the top of your form:
- “What best describes you?” (options like Individual, Small Team, Enterprise, Partner)
- “What are you primarily interested in?” (Current product, New product line, Not sure yet)
Step 2: Use conditional sections as pseudo-flows
Based on their answers:
- Show a short signup section for Individuals and Small Teams
- Show a high-touch intake section (more context, timelines, budgets) for Enterprise
- Show a waitlist section for those interested in the new product line
Each section can have its own confirmation message and follow-up expectations.
Step 3: Use custom URLs and confirmations as your “UI switch”
With Ezpa.ge’s custom URLs and post-submit options, you can:
- Redirect high-value Enterprise submissions to a dedicated thank-you page with a Calendly link
- Keep Individuals on a simple “You’re in” page with a link to start using the product
- Send new product line interest to a “coming soon” page with a teaser
From the user’s perspective, they clicked one link. Behind the scenes, your form logic acted like a feature flag router.
For a deeper dive on using links themselves as the experiment surface, our post on URL-First Campaigns pairs nicely with this approach.
Use case #3: Toggling operational workflows on and off
Not every “feature flag” is about UI. Sometimes it’s about internal workflows:
- Turning on a manual review step for certain submissions
- Temporarily enabling a white-glove onboarding track
- Pausing a risky experiment without killing the form
Here’s how to do that with forms + Sheets.
Step 1: Add an internal-only control field
In your Google Sheet, add a column like:
manual_review_enabled(TRUE/FALSE)
Or create a tiny internal Ezpa.ge form just for ops that writes to a control tab in Sheets, with fields like:
- “Enable manual review for high-risk signups?” (Yes/No)
- “Current experiment mode” (Off / Beta / Full)
Step 2: Use logic that reads from your control sheet
While forms themselves don’t “read” from Sheets, your automations can.
For example, in Make or Zapier:
- Trigger when a new form response arrives in Sheets.
- Look up the current control row (e.g.,
manual_review_enabled). - If TRUE and the submission meets certain criteria (e.g., large contract size), send it to a special Slack channel or create a ticket.
- If FALSE, let it follow the normal automated path.
Your ops team can now flip manual review on or off by editing a single cell or submitting a tiny internal control form—no engineers required.
If you’re interested in this pattern, we go deeper on these automations in No-Dev Ops: Automating Product Workflows.
Practical patterns you can steal immediately
You don’t have to redesign your stack to get started. Here are concrete patterns you can implement this week.
1. Beta interest switch
Use when you’re considering a new feature but haven’t committed to building it.
- Add a question to existing forms: “Interested in early access to X?”
- If Yes, show a few extra questions to understand their use case.
- Tag them in Sheets with
feature_x_interest = TRUE. - When you’re ready, invite a small group first.
2. Risk-based branching
Great for flows that might involve sensitive data or complex compliance.
- Ask: “Is this for personal use or on behalf of an organization?”
- Ask: “Will this involve financial, medical, or legal data?” (checkboxes)
- If they select high-risk categories, branch to:
- Additional consent language
- A warning about limitations
- Optional white-glove support
This pairs well with the patterns in Security Without Paranoia and Form UX for High-Stakes Data, if you’re thinking about trust and compliance.
3. Quiet segmentation for future toggles
Even if you’re not sure what you’ll launch next, start collecting lightweight segments now:
- Role (IC vs manager vs exec)
- Primary job-to-be-done
- Industry
Use conditional logic to keep this painless:
- Only ask 1–2 extra questions when the user is already engaged
- Show different options based on previous answers (e.g., role-specific use cases)
Later, when you want to soft-launch something for “PMs at SaaS companies with >50 employees,” you already have the segments in your sheet. You can treat those rows as your flagged cohort.
4. On/off experiments at the confirmation layer
If you’re nervous about messing with your main forms, experiment at the confirmation step:
- Use conditional logic to show different confirmation messages based on a random assignment field (e.g.,
variant_avsvariant_b) - Or, redirect some users to an experimental follow-up form while others see the standard thank-you
You’re effectively running a feature-flagged experiment on post-submit experiences—upsells, surveys, onboarding steps—without touching your core flow.
Guardrails so your "form flags" don’t backfire
With great power comes… a few things worth doing right.
-
Make ownership explicit
Decide who owns:- The form (marketing, product, ops?)
- The logic (who can change it?)
- The data (where it lives, how long you keep it)
-
Document your logic in plain language
For each form, keep a short doc or tab that explains:- Who should see which branches
- What each tag/column in Sheets means
- How to safely pause or change the experiment
-
Avoid surprise experiences
If someone is routed into a beta or experimental path, tell them. A simple line like:- “You’re seeing an early version of this flow as part of a limited test.” goes a long way for trust.
-
Keep security in view
Even low-code experiments handle real data. Make sure you:- Limit access to the response spreadsheet
- Avoid collecting sensitive data you don’t truly need
- Align with the patterns in Ops-Friendly Form Security
-
Plan an exit
Every experiment should have:- A review date
- Criteria for success/failure
- A clear path: roll out wider, keep as-is, or shut down
Feature flags in code can linger for years. Don’t let your form-based flags become the same kind of ghost.
Putting it all together
When you treat forms as feature flags, you unlock a different way of working:
- Product doesn’t have to wait on engineering to learn whether something is worth building.
- Marketing can route different segments to different offers from a single link.
- Ops can toggle workflows and review steps on and off without a deploy.
You’re still using the tools you know—forms, Google Sheets, basic automation—but with a more intentional mindset: forms as control panels, not just data collectors.
If you’re already using Ezpa.ge, you have most of what you need:
- Conditional logic for branching
- Custom URLs and confirmations for routing
- Real-time Google Sheets syncing for flag tables and cohorts
The remaining piece is a habit: whenever you catch yourself saying, “We need engineering to gate this,” ask instead:
“Could we soft-launch this with a form first?”
Quick recap
Here’s the essence of using forms as feature flags:
- Start with eligibility, not UI. Use form questions to decide who should see or get what.
- Branch with intent. Conditional logic turns one form into multiple tailored paths.
- Use Sheets as your flag store. Columns and tags become your on/off switches and cohorts.
- Experiment at the edges. Confirmations, follow-ups, and betas are perfect low-risk starting points.
- Protect trust. Be clear, secure, and deliberate about what’s experimental.
Your next step
Don’t try to rebuild your entire experimentation program overnight. Pick one idea that’s been stuck behind an engineering dependency—maybe a new pricing option, a concierge onboarding track, or an early-access feature.
Then:
- Create a new Ezpa.ge form (or duplicate an existing one).
- Add 1–2 eligibility questions and a conditional branch.
- Sync it to a fresh Google Sheet with clear columns for your “flags.”
- Share that single URL with a small audience and watch what happens.
You’ll learn more from that one form-in-the-wild than from weeks of internal debate.
And once you’ve seen it work, you can start designing forms as feature flags on purpose—turning your experiments into a repeatable, no-code practice that the whole team can run.